Make a table for deck or patio of your home

This gorgeous table is made from nothing more than old timber pallets that have been stripped apart and then sanded. The idea is to leave the reclaimed timber in its natural state rather than finish off with anything. I do think it just adds to the whole look.
Gather together some old packing crates or pallets and strip these down into individual planks. You're probably going to need three or more if possible, as not all the wood is going to be usable.
You want to create a slightly rectangular frame - or square - and then use pine to fit a centre section into the table to hold the succulents.
Once the centre section is fitted, you can start making the top section by cutting planks to the same length and nailing a support board on the back to hold them all together nicely.
Use more reclaimed pallet timber for the legs and screw these onto the table frame.
Drill a few holes into the base of the centre section to allow for drainage - you will only be planting succulents and these require minimal water.
No you are ready to plant up the table. Add gravel mixed with top soil as the base mixture, pop in your succulents and then finish off with small pebbles.

  • Digg
  • Del.icio.us
  • StumbleUpon
  • Reddit
  • RSS

Is the TV a focal point in your home?

I often receive enquiries about decorating around the television and this can be a problem if you don't want it to be the focal point of a room. Even if you're not a regular TV viewer, you will still have at least one TV in the home.  
If you've gone to the expense of buying a flat screen TV - why hide it! I don't see why a TV can't be the focal point, especially if you watch a lot of TV, and let's be honest - many do. Whether it's catching up on the latest news, watching National Geographic, or sitting down to watch the latest sport matches - a TV has become the focal point in many homes. So, here are some options for designing a room with the TV as a focal point - or not !


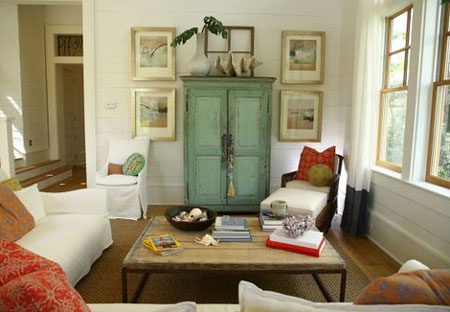
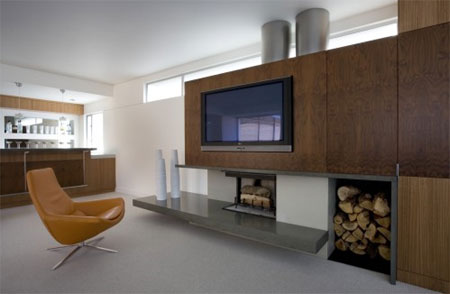
I’m still a fan of an armoire or cabinet, as long as you have an interesting and unique piece. But... 

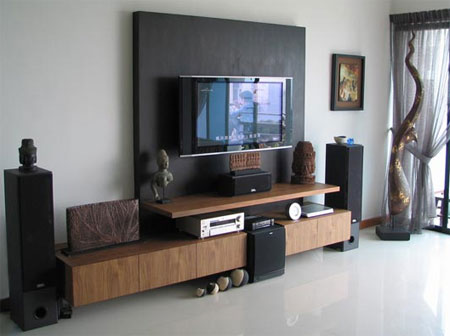
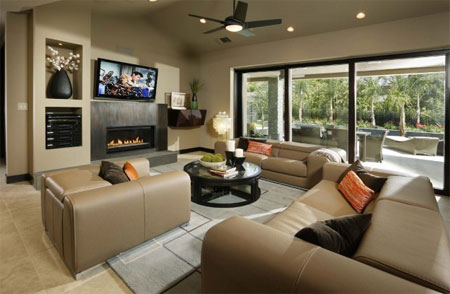
ABOVE: Placing a dark panel behind the flat screen unifies the TV with the contemporary cabinet.

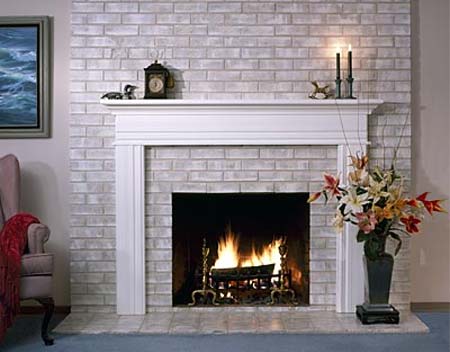
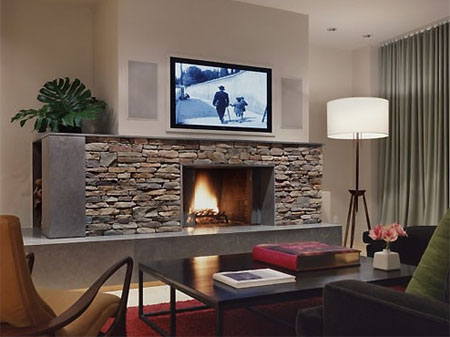
Placing a flat screen television above a fireplace or on an accent wall will give visual interest that may need additional décor. Having said that, not everyone has a fireplace. So where do you put the flatscreen TV?
Focal point or not?
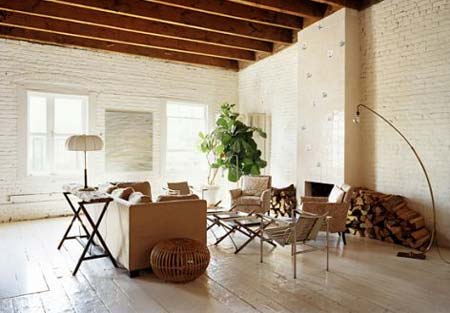
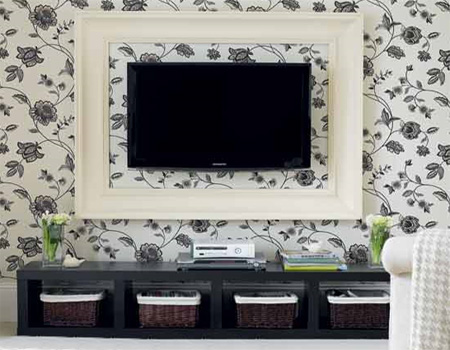
If you don't want the TV to be a focal point, install it low on a small stand or cabinet, or wall-mount at slightly lower than eye level. This allows for the actual wall to remain the star, especially if the wall is covered with an interesting material or texture.
image casa sugar

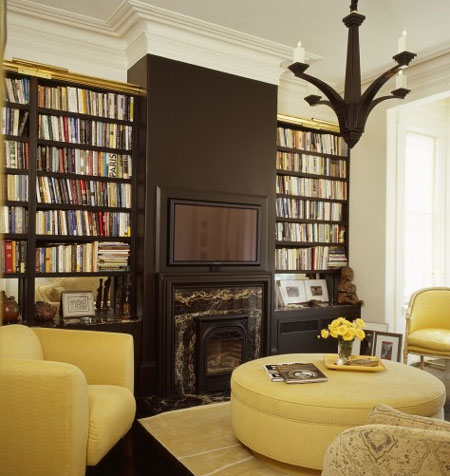
Alternatively, placing the flat screen TV to one side of a room will make it less of a feature, but also less easier to watch. And when placed within a bookcase of wall unit, books, accessories and pictures make a flat screen TV almost invisible.


As a focal point in a room, make the TV the centre of attention by mounting onto an attractive panel, against a wallpapered wall, or placed on a stunning display unit.

image finding home
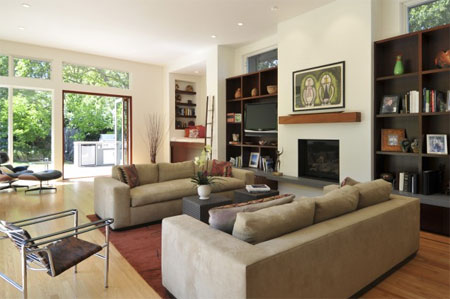
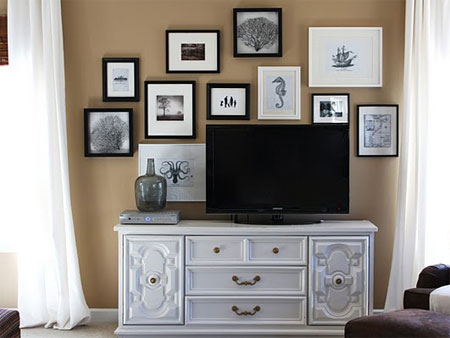
ABOVE: The placement of this TV grabs attention but it's not the first thing you see. The arrangement of art and the beautiful TV cabinet visually demand more interest.
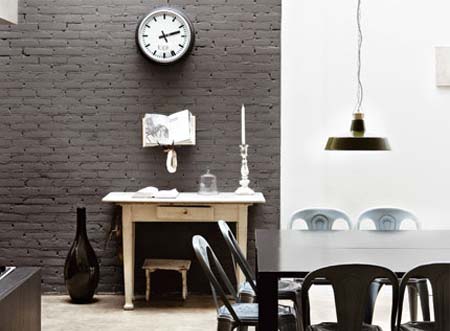
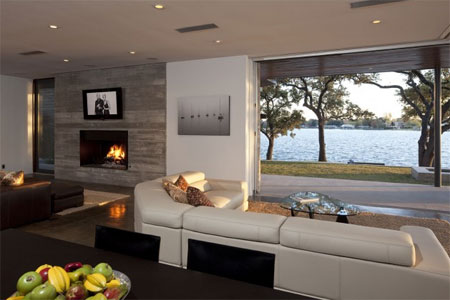
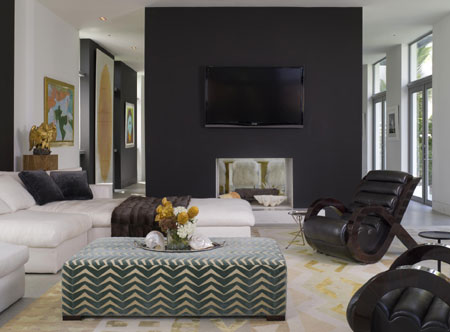
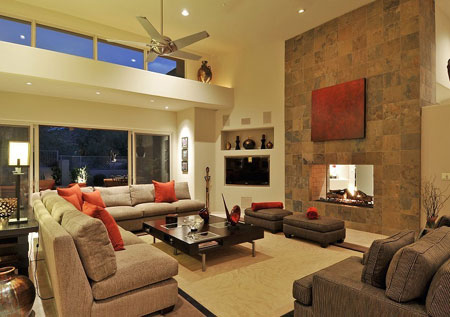
BELOW: In this living room the flat screen TV is mounted on feature wall, but does not demand attention by blending in with the wall colour. Painting the wall dark makes this flat screen disappear.
image jerry jacobs design
Depending on the height you choose to view your television will dictate how to add artwork or decorative items around it. For those that want it stand mounted on a low console, you will be able to optimize more of the wall behind it for artwork.  While if you decide to mount it on the wall, the television can compete with artwork – which can be distracting.
If you absolutely must hang artwork on the same wall as the TV, test the arrangement before you go to the trouble of banging in the nails !

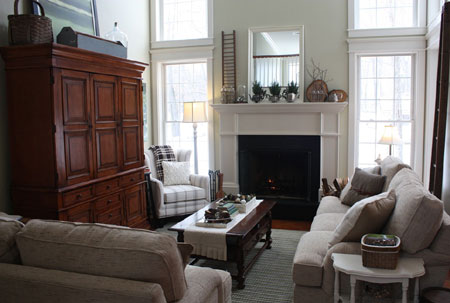
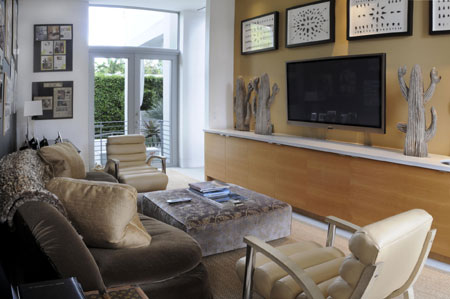
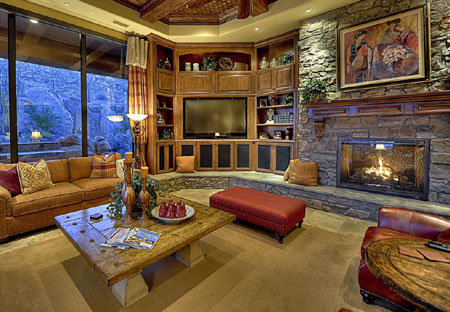
ABOVE: If you don't want your flat screen TV to stick out like a sore thumb, don't hang it so that it floats on a wall with nothing underneath. Make it a part of the room by adding a console or media cabinet to fill in the space. Add a few artfully placed objects and you're done.
BELOW: In an awkward-shaped room there's an advantage to use an awkward corner to best advantage - for mounting a complete TV cabinet.

Of course, if your home is contemporary, sophisticated minimalist or mod you're going to want the TV out on display - and the more visual the better !
The sleek, ulta-thin design of a flat screen TV lends itself well to contemporary spaces.


  • Digg
  • Del.icio.us
  • StumbleUpon
  • Reddit
  • RSS

home and laundry - easy anti-static solution

With winter well on it's way more clothes will be going into the tumble dryer. Did you know you can get static-free clothes with a few household items you can easily find in your own home ... some tennis balls.
To keep fabrics soft and cling-free, toss three tennis balls into your dryer and run them through a cycle. You'll be amazed at how softer your clothes come out, and you've saved a few bucks along the way!
You can make the dryer balls to any convenient size, but the ones you can buy are about nine inches around. Since the natural wool balls shrink a little prior to felting, you can make them about ten or so inches in circumference to get a finished size similar to the commercial dryer balls.
You will need:

Wool Yarn - Machine washable yarns aren’t any good for this project!
Old Pantyhose or a sock
Cotton or string
Scissors
Crochet hook
Measuring tape
Here's how:

1. Begin making the core of the ball by winding a bit of yarn around your fingers.
2. Once you have a bit done, take it off your fingers, let it close and wrap the yarn around it. This is the beginning of your ball.
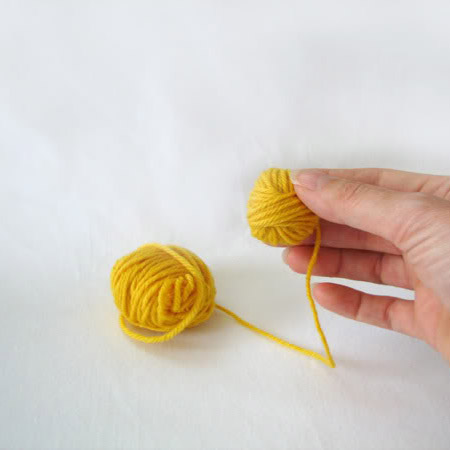
3. Continue wrapping the yarn around and forming a little ball. There is no right or wrong way to do this step, as this will be completely covered up later on.
4. Once you have a small ball, cut the yarn and tuck the end under using the crochet hook. This will keep it from coming loose during felting.

Felting
5. Put your small wool balls into a length of pantyhose or knee-high sock. Tie the hose closed between each ball with a piece of cotton or string using a secure knot. This will keep the balls separated during felting.
6. Toss the wool ball pantyhose caterpillar into your washer with a load of laundry. Hot water will help the felting process. If you have used a hand-dyed yarn, or wool that is not colourfast, be aware that the dye may run.
7. Once the dryer balls have been washed and dried, cut the strings between the hose and remove them. They should be slightly felted. If you want them felted more, run them through another load.
8. Begin winding more wool yarn onto the ball and continue winding until the ball is the size you want. Tuck the end under using the crochet hook.
9. Once you have your dryer balls the size you would like, put them into the pantyhose again, tie them, and repeat the felting process. The balls don’t have to be completely felted before you can start using them; just slightly felted will do, so they won’t come apart. They will continue to felt and get harder as you use them.
Your natural wool dryer balls are now finished.

  • Digg
  • Del.icio.us
  • StumbleUpon
  • Reddit
  • RSS

Keep towels soft and fluffy

Buying towels is not something you want to have to do every few months. Quality towels should last years, standing up to the rigours of regular use. But how do you keep them fluffy and fresh? By taking proper care of your towels, you can keep them looking new for years to come. Here’s how...


Forget fabric softener 
While you may be inclined to add fabric softener to your load of laundry, think twice about it. It coats fibres with a waxy layer, making towels less absorbent. Make sure the detergent you use doesn’t have a built-in fabric softener, either. If you love the smell of fabric softener, use scented linen water.

TIP: Add ¼ to ½ cup of white vinegar to a load to soften towels.

Keep colours bold
Hot water is good for eliminating germs, but it also fades colours. Warm water will keep colours bold and prevent towels from wearing down quickly. Even if your towel’s label says it’s colourfast, wash colours separately for the first few times. It’s a bit of a hassle but it helps maintain your towel’s original colour. Never wash whites with colours.

Use mild detergent

Stick with mild detergents for warm water washing, as strong ones break towel fibres down faster. Opt for a liquid detergent, as powdered ones may not come out in the rinse cycle and instead get stuck in the fibres — not good for those with sensitive skin. If you’re using a powdered detergent, add it as the washer is filling with water and add the towels when the water level is just over half-full.

Buy white towels
White towels are the way to go for easy maintenance and will create a spa-like look in your bathroom. Bleach them once in a while (not each time they’re washed; that’ll cause the fibres to break down faster) and you’ll have a new-looking, thoroughly disinfected towel. Warm water is still recommended, but hot can be used for stain removal. Another plus? They’re easier to replace than coloured towels (try matching dye lots years later!) and they go with most, if not all, colour palettes.
Moderate drying time
You never want to bake your towels in the dryer! Don’t leave them in there until the towels are super hot. Not only will that wear down the towels but over time, it will cause yellowing, especially on white towels.

Rotate sets
A set of towels consists of a bath towel, hand towel and face cloth. Consider buying two sets per person in your household and rotate sets each time you do laundry. That minimizes the use of each set, helping them last longer.


Additional tips for laundering linens

1 Wash towels prior to using them for the first time to remove germs and make them more absorbent.

2 Wash bath towels at least once a week.

3 Don’t overload the washer. If too many towels are stuffed in, the fabric can get pulled from the tension.

4 Only wash towels with towels, if possible

  • Digg
  • Del.icio.us
  • StumbleUpon
  • Reddit
  • RSS

Kill bacteria in your property with - Vinegar

Over the years I have found three natural ingredients that kill mould: Tea tree oil (an essential oil found in most health food stores), grapefruit seed extract and vinegar. There are pros and cons of each, but all three work. Vinegar is by far the cheapest. Tea tree oil is expensive, but it is a broad spectrum fungicide and seems to kill all the mould families it contacts. The problem is that it has a very strong smell, but that dissipates in a few days. Grapefruit seed extract is also expensive, but has no smell.


Spirit vinegar is a mainstay of the old folk recipes for cleaning, and with good reason. The strength of vinegar is that it kills bacteria, mould and germs.
Numerous studies to show that a straight 5 percent solution of vinegar - thekind you can buy in the supermarket - kills 99 percent of bacteria, 82 percent of moulds, and 80 percent of germs (viruses) and it seems to be common knowledge in the industry that vinegar is powerfully antibacterial.
Just like antibiotics, common disinfectants found in household sprays may contribute to drug resistant bacteria, according to researchers. Furthermore, research shows that many commercial disinfectants are ineffective to begin with, just like antibiotics.
Keep a clean spray bottle filled with straight 5 percent vinegar in your kitchen near your cutting board, and in your bathroom, and use them for cleaning. I often spray the vinegar on our cutting board before going to bed at night, and don’t even rinse, but let it set overnight. The smell of vinegar dissipates within a few hours. Spirit vinegar is also great for cleaning the toilet rim. Just spray it on and wipe off.


Use one teaspoon of essential oil to 2 cups of water in a spray bottle (make sure to avoid eyes). A grapefruit seed extract spray can be made by adding 20 drops of extract to a quart of water.

  • Digg
  • Del.icio.us
  • StumbleUpon
  • Reddit
  • RSS

Your property - A friendlier alternative to mothballs

My grandmother’s home always had a distinct smell; a combination of various foods and mothballs. Oh, she was obsessed with controlling moths; to the point that she kept almost everything wrapped in plastic and packed with mothballs! Apart from having a pungent odour, are mothballs possibly dangerous as well?


Mothballs are made out of naphthalene or dichlorobenzene and are considered a pesticide. They also contain paradichlorobenzene (PDB), which has been linked to kidney and liver failure along with many other ailments. They work by releasing a gas that ferments and grows stronger over time, and can be hazardess to humans and animals. They are especially toxic if digested, so be sure to keep them away from animals and children. Although in small doses, not many people react to the gases, some may develop headaches or dizziness. In the past couple of years, another problem associated with improper usage of mothballs has arisen. Teenagers began “bagging” them and inhaling the condensed gases leading to more severe health issues.
To their credit, they are very effective at controlling moth larvae, but at what cost? Although you can argue my grandmother lived to 93 with no major health issues whatsoever; why take the chance? Why not choose an alternative that is natural and known to be safe for both you and your family? In my quest, I’ve found a couple of alternatives: Lavender, rosemary, thyme, mint, cloves, and cedar are a few natural deterrents for moths, and all smell incredibly better than mothballs. You could also try a potpourri sachet of dried eucalyptus and bay leaves, cloves, cinnamon sticks and pepper corn. But you need to be careful that these things do not come in direct contact with your clothes.
DIY moth and fishmoth repellant
Arrange to have small meranti blocks cut at your local hardware store. At the top of each block insert a hanger that is large enough to hang on the closet rail. Sprinkle drops of essential oils: lavenderclove, and rosemaryonto the blocks on a weekly basis and say goodbye to holes in clothes.

  • Digg
  • Del.icio.us
  • StumbleUpon
  • Reddit
  • RSS

How to get onto the property ladder

Most people who are shopping for a home have something specific in mind, but often what they can afford to buy doesn’t match the mental picture.
Your first house probably won't be your dream house, but it can be a good place to start working towards it.
When looking around for a home these days, buyers often have to make some kind of compromise between price and the home’s features. We would all love to be able to buy our dream home, or even build it from scratch so that it suits our requirements perfectly. However, many are not in the financial position to do this.
Bearing the current mortgage market conditions and affordability factors in mind, coupled with the fact that the interest rates are set to increase this year, possibly even sooner than many think, the best place to start is to buy small and then build up to your dream home.
While now is a good time for buyers to get into the property market, they have to be realistic about what their money can buy. Although first-time buyers may not be able to start out in their dream home, they can still enjoy the benefits of homeownership in a more affordable starter home.
Accommodation requirements change over time, and therefore, young couples or up-and-coming executives or any first-time buyer for that matter should not be afraid to start off with a modest home or apartment that will serve their needs well for a few years as well as fit into their budget.
The best place to start paring down the must-have features is to make a list of all the features you would want in your dream home like a home theatre, swimming pool or large entertainment area, for example. Keep that list to work towards in the future and make a separate list of all the features you feel you could not live without like a certain number of bedrooms, security etc.
While the features you cannot live without may not be conducive to a space that is, for example, ideal for large-scale entertaining, remember that a starter home or apartment will come at a much smaller price tag. Added to this, after a few years, you will have acquired some equity in the home, making it easier for you to move up to a bigger, more accommodating space when you sell.  In addition, the less money a buyer spends on a home now, the smaller the deposit that will be required for payment upfront.
While buyers may need to be negotiable on certain features of a property in order to accommodate their budget, here are some pointers that can minimise the discrepancy between dream home and starter home and help buyers fast-track their dream home purchase:
1. Start saving for the deposit before you start shopping for a home
The more you have saved up as a deposit, the better your chances of getting a good finance deal
2. First buy a small house with a lower bond
Your first house probably won't be your dream house, but it can be a good place to start working towards it.
3. Save extra money for other home expenses
Buyers would be wise to have a little savings to draw on to help them pay for items such as new paint, additional furniture and any maintenance or repair work that needs to be done. Ideally buyers should have approximately 5% of the value of the house saved for these costs.

4. Be ready for the worst case scenario
Prepare yourself financially for any worst case scenario. For example, with interest rates set to increase, budget for around 2% increase over the next couple of years and build your financial plan around that number. If things turn out better, you'll be ahead of the game.

5. Pay off your bond as quickly as possible
It would be ideal for buyers to budget for larger repayments than the minimum required on their bond each month or to pay in lump sums as and when they receive bonuses and the like. Paying off your bond faster can reduce the amount of interest you pay, and if you hit hard times, you will have paid in enough to be able to negotiate terms with your financial institution.
In the current market, buyer affordability is all about working smartly with your money and building up your resources to enable you to afford that dream home. 

  • Digg
  • Del.icio.us
  • StumbleUpon
  • Reddit
  • RSS

Decorating options for face brick homes

Face brick walls in your home - you either love it or hate it. They impart a sense of age and texture to a room but they can easily overwhelm a small space.


There are some people who believe exposed brick should never be painted. People on the other side of the issue feel that brick is heavy and dark and the best path to happiness is a coat of paint.
Admittedly, it’s a tough choice. After all, the patina that old brick takes on with age can be exceptionally beautiful. So can the warm yet industrial feel. On the other hand, we have been in apartments with lots of exposed natural brick and we’ve felt a certain sense of heaviness. This is often exacerbated by the fact that many people with exposed natural brick are loathe to hang artwork on their exposed brick walls.
Ask yourself these questions if you’re considering painting your exposed brick:
  • What kind of feel do you want your space to have?If you’re going for a light and airy feel, exposed brick is not going to give it to you. Painted brick works best in spaces that are dark, with too few windows, or if there is a lot of exposed brick in the space.
  • What is the condition of the brick itself?What colour is the brick? Is the wall exceptionally dusty or in bad shape? Is the wall exceptionally damp? If your brick has an unsatisfying colour, or if the wall is dusty, you may be better off painting the brick. If you want to keep your brick its natural colour without the dust, you can use Prominent Paints Brick Dressing, which is designed to treat natural brick without changing the colour.
  • Are you planning to sell soon?
    Because painted brick is such a polarizing issue, you may be better off leaving your brick unpainted if you will need to sell your home soon. Leaving the brick unpainted may turn off buyers who love painted brick, but they will know that they can always paint it. On the other hand, those who hate painted brick may feel that there’s not much they can do to change a painted brick wall.
  • Are there other options for lightening your space?If painting the brick seems like too big of a step, and yet you want to brighten up a dark room, try hanging mirrors and artwork on your brick wall instead. A painting in light tones and pale shades will contrast with the brick and help balance out the dark wall. We see too many homes where owners allow a huge expanse of exposed brick to stand naked, thus overwhelming a space.
Whilst some enjoy being surrounded by the raw beauty of face brick walls, there are others that find it old fashioned, drab and a nightmare to keep clean. There are options ...
As pizazz to interior brick walls and brighten up your home. Paint is an easy way to put new life into a dingy brick wall and it's an easy project that requires only a few basic materials.
1. Preparation, cleaning and repair
The first and most important step in the entire process is to ensure that brickwork is clean and in good condition. Give the wall a good brushing with a nylon scrubbing brush and follow this up by cleaning with a vacuum cleaner to clean out between any gaps. Whilst doing this you can also check out the wall for any cracks or large holes that need to be fixed before painting.
After cleaning, the mortar can be repaired and all holes or cracks filled. There are various products that can be used from interior crack filler to silicone sealer for larger gaps, such as those around windows or doors.
2. Priming the surface
Priming interior brick is necessary to ensure proper bonding between the paint and the wall. A 100% acrylic universal primer is a good choice, such as Prominent Paint Plaster Primer, especially where brick is chalky, as it helps to bond the paint and reduce the number of paint coats required.
3. Choosing the right paint
Next is the type of paint to use. You have a large amount of paint types and sheens to choose from. Painting interior brick will take more time and effort than an ordinary wall. Plus, you will be in close proximity to the paint and its fumes. For these reasons water based paint - such as the Prominent Paints matt or sheen range - should be used.
4. Painting the wall
Lay drop plenty of dropcloths before starting. The easiest and quickest way to apply paint to brick is with a paintbrush as it allows you to get into the crags and crannies of rough brickwork and mortar joins. Have various sized brushes for different tasks.
Painting interior brick is easy but it's also tedious. Working with sections will let you glance back at previously painted areas and catch any drips that have developed plus quickly touch-up any thin areas.
Whitewashing
If you don't want a solid colour on the wall, but rather a lightening effect, whitewashing is the best option to choose. It is also much easier to remove if you change your mind later on.
Bricks washed over with watered down matt paint rather then covered up show variation in tone and depth making it more interesting to the eye. It achieves the lighter, softer look you want yet you can still see the brick underneath.
Cover up with dropcloths before you start - this can get messy. Mix 50:50 paint and water and stir well. The more water you add the more translucent the final result. Use a whitewashing brush to apply the paint to a small section at a time.

Remember that brick when unsealed is extremely porous and will take a lot of liquid into it before it resembles a colour (which may be just what you want).
Exposed brick is usually always touted as "good looking" by real estate brokers and, indeed, it can add some real character to an otherwise cookie-cutter apartment, but we don't think it is sacred. Some brick is ugly and some is quite dusty over time. The color and condition of the brick determines - for us - what to do with it.


  • Digg
  • Del.icio.us
  • StumbleUpon
  • Reddit
  • RSS

Top 5 home renovation tips that pay off


Many homeowners are opting to renovate their home to accommodate their changing requirements or to fix it up before they sell with the hope that it will add to the market price of the property. While home improvement projects can really add to the appeal and practicality of a home, some will add more value onto the bottom line than others. 
One way to check the real market value of properties in your area, street or complex is to get an online property valuation report, which will give you information on what other similar homes have recently sold for. This way you can get a more accurate idea of what your property might be worth. 
Homeowners undertaking renovation projects cannot expect to splurge on expensive fittings and fixtures and recoup the value of the project when the house sells. Just because you spent R200 000 on home improvements does not mean that your house is worth R200 000 more. 
Factors such as the direction of the general housing market, the value of homes in the neighbourhood, the nature of the renovation project and how soon the home is sold after the improvement project is completed will have a bearing on how much of the renovation cost is recouped. 
The general rule is that the longer the homeowner stays in the home after undertaking renovations, the less likely they are to recoup its value. This is because different owners have different requirements and tastes differ too. What one homeowner finds appealing, another may not and style and fashion trends can change dramatically over a relatively short period of time.
Homeowners should always remember that having the fanciest house on the block is not necessarily going to mean it will sell for the highest price on the block. In fact, a house that is priced higher than its neighbouring homes could be perceived as overpriced even if it does have more value. One way to check the real market value of properties in your area, street or complex is to get an online property valuation report, which will give you information on what other similar homes have recently sold for. This way you can get a more accurate idea of what your property might be worth. 
Five top improvements that pay off more often than not: 
1. Kitchens
Because many buyers see the kitchen as the heart of the home, even a few basic improvements to this room can really pay off. Consider including energy efficient appliances, stainless steel, new countertops, a new sink, a coat of paint and new flooring. Cupboards can also be sanded, stained, painted or replaced if necessary. Where possible a classic design and neutral paint tones are best as these will appeal to a broader range of people. A well renovated kitchen can recoup between 70% and 80% of the remodelling cost when the home is sold. 
2. Bathrooms
Kitchens and bathrooms are known to give the best boost in value, so these are the two areas of the home where renovation costs can be more readily recouped. In fact, you should make back between 65% and 75% of your costs of remodelling a full bathroom and around 65% of the cost of adding a full bathroom. Consider new fixtures including a bath tub, a double sink instead of a single one, recessed lighting, new flooring and wall tiles if necessary and a fresh coat of paint. 
3. Creating space
As a rule, improvements that increase the functional space of a home hold their value longer than ones that just make a house look better. This option is also often significantly cheaper and less of a hassle than adding a completely new room to your home. 
4. Security, windows and green products
With increases in electricity and a generally higher cost of living, utility bill savings are a big advantage, and so it stands to reason that shrewd energy-efficient improvements can add to the resale value of a home. Efficient windows and doors, a new roof and perhaps maybe even solar panels may be pricey to install, but around 65% to 76% of this cost could be recovered at resale. Security features are also always an important consideration in the home buying process, and many South African homeowners will appreciate a strong security system in a home.
5. Basic Improvements
There are also some home improvements and additions that are nice to have, but that add very little value to a home’s selling price. These are: 
The basics are always more important than fancy new fittings and fixtures. A beautiful new kitchen and bathroom will add no value if the roof is leaking or rising damp is a problem, for example. It is the basic improvements that will provide the greatest return on a home's value. Homeowners who are considering selling in the next year or so need to start any home improvements by tackling problems with the home's structure or systems such as the plumbing before installing a Jacuzzi, for example. 
Swimming Pools
While nice to have and a great facility for many homeowners, a swimming pool adds no value to a resale price at all. In fact, some home buyers spend thousands of rands to fill in a pool after purchasing a property. Expensive upkeep and the fear of liability mean that for some, the responsibility of a swimming pool will detract from a property more than add to its value.
Manicured Gardens
Manicured gardens which will require time and money to keep looking good usually won't add to the selling price. With today’s hectic lifestyle, many homeowners are looking for hassle-free and low-maintenance homes. While landscaped gardens certainly add appeal to any home, when it comes time to sell a property, a garden is not going to add to the price tag, and should rather be considered as investment for the owners’ enjoyment. The same goes for expensive fences and stone walls. They look nice, but buyers don't pay up for them. 
Any homeowner wanting to undertake a home improvement project should be careful to keep within the limits of the neighbourhood.  Adding features such as a home theatre, games room, sauna or built-in bars are great projects if the owners are planning on staying in the home for a long time and are not too concerned about the resale value. The best point of reference to determine your ceiling is when it comes to renovating is to consult your real estate agent about property prices and requirements in your area.
Active Network Properties - South Africa - 012 546 5555 

  • Digg
  • Del.icio.us
  • StumbleUpon
  • Reddit
  • RSS

A lower electrical bill makes your home smile


Energy Saving TIPS...


Fit a solar geyser so the sun can heat your water for free.
 Lower your geyser's temperature to 55° and reduce its
energy usage by 20%. Intelligently control.
 Remember, your geyser is responsible for roughly 40% of your household's energy consumption.

To manage the energy used by your geyser, fit a digital timer.
Switch your geyser off whenever hot water is not needed. E.g. weekends away, during holidays and when you are at work to save energy.
Use timers on your geyser unit to automatically manage water temperature so you can save energy and never worry about coming home to cold water.

Heat water, use it and then switch the geyser off. This will reduce standing losses, saving you energy and money.


  • Digg
  • Del.icio.us
  • StumbleUpon
  • Reddit
  • RSS